Introduction
This book describes how to work with AdPlayer Lite library.
Tags
AdPlayer Lite library works with publishers and tags. Publisher is a unique ID for the whole organization, while Tag is a placement configration on the screen. There can be any number of tags but only one publisher.
Tags can be created and configured by using the admin console.
Types of Tags
Tags can be split into to categories:
- Outstream - displays only a series of Ads
- Instream - displays video content interleaved with Ads
Running Example App
Running example application requires publisher and tag ids. They can be configured in the root local.properties file like this:
sdk.dir=...

av_pub_id={published id goes here}
av_tag_id={tag id goes here}
After this project can simply be opened in the Android Studio and built.
Project Configuration
Before using AdPlayer Lite library project must be properly configured.
- Add Maven repository to
settings.gradle.kts:
dependencyResolutionManagement {
    repositories {
        maven("https://us-central1-maven.pkg.dev/mobile-sdk-fd2e4/adservr-maven")
    }
}
- Add library dependencies to the app's module
build.gradle.kts:
dependencies {
    implementation("com.adservrs:ad-player-lite:2.3.0")
}
- Add GMS configuration to the
AndroidManifest.xml:
<application>
    <meta-data
        android:name="com.google.android.gms.ads.APPLICATION_ID"
        android:value="ca-app-pub-6746653557725812~6678258028" />
    <meta-data
        android:name="com.google.android.gms.ads.flag.OPTIMIZE_INITIALIZATION"
        android:value="true" />
    <meta-data
        android:name="com.google.android.gms.ads.flag.OPTIMIZE_AD_LOADING"
        android:value="true" />
</application>
Now your project is configured and you can move to creating first in-read placement.
Creating In-Read Placement
Creating AdPlayerView
AdPlayerView is the main View that is responsible for displaying in-read ads.
This view can be added via code:
val view = AdPlayerView(context)
view.load(pubId = "PUBLISHER_ID", tagId = "TAG_ID")
addView(view)
Or though the layout xml files:
<com.adservrs.adplayer.lite.AdPlayerView
    android:id="@+id/ad_player"
    android:layout_width="match_parent"
    android:layout_height="wrap_content" />
It is not possible to load content from the xml file so it is still required to call AdPlayerView.load from the code.
Releasing AdPlayerView
AdPlayerView will try its best to release all used resources when GC-ed but it is highly recommended to explicitly release it to avoid unwanted side-effects:
val view: AdPlayerView = TODO()
view.release()
Releasing AdPlayerView will immediately free all used resources (including attached AdPlayerInReadController).
Layout Contract
AdPlayerView will strictly follow any measuring specs provided. View will try to fit 16/9 video and any required decorations (like labels, close buttons, etc.) into given constraints.
In case both width and height constraint are unbounded it will fallback to the predefined hard-coded size.
Launching Interstitials
Unlike in-read mode, interstitials don't require any placement view. Instead the are always displayed in fullscreen. Interstitials, unlike regular fullscreen, will also be automatically closed after the first video finishes.
Creating Interstitial Controller
An AdPlayerInterstitialController must be created before launching interstitial:
val tag = AdPlayer.getTag(context, pubId = "...", tagId = "...")
val controller: AdPlayerInterstitialController = tag.newInterstitialController()
Additional configuration can also be provided during creation if needed:
val controller: AdPlayerInterstitialController = tag.newInterstitialController {
    // change background color of the window
    backgroundColor = Color.BLACK

    // disable back buttons/gestures so interstitial cannot be skipped
    dismissOnBack = false

    // this callback will be triggered when interstitial is closed
    onDismissListener = {
        Log.d("TAG", "Interstitial was closed")
    }
}
Some of these configurations above can be also configured on the admin portal. Values provided though the code will always override portal configuration.
Releasing Interstitial Controller
AdPlayerInterstitialController, like any other controller, must be always released when no longer needed to release underlying resources:
val controller: AdPlayerInterstitialController = TODO()
controller.release()
Launching or Dismissing Interstitial
Interstitial can be launched after creating AdPlayerInterstitialController:
val controller: AdPlayerInterstitialController = TODO()
controller.launchInterstitial()
Interstitial can also be forcibly closed if needed:
val controller: AdPlayerInterstitialController = TODO()
controller.dismissInterstitial()
It is important to remember that each controller can at most launch one interstitial at the same time.
Tag Basics
What is a Tag?
Tag is a factory used to create controllers.
Creating a Tag
Tag can be created by using AdPlayer global object:
val tag = AdPlayer.getTag(context, pubId = pubId, tagId = tagId) {
    // override default environment
    // * since 1.0.0
    environment = "tg1"

    // override package name used for requesting ADs and analytics
    // * since 3.1.0
    packageName = "com.organization.application"

    // additional macros used for requesting ADs
    // * since 3.4.0
    macros = mapOf(
        "AV_APPNAME" to "My Awesome Application",
        "AV_APPSTOREURL" to "https://play.google.com/store/apps/details?id=com.awesome.app",
    )
}
Controlling Playback
What is Controller?
Controller is the main entity responsible for loading and controlling (pausing, skipping, unmuting, etc.) a content. All controllers inherit AdPlayerController, which provides most common functionality.
There are also more specialized controllers available:
AdPlayerInReadController- for working with in-read contentAdPlayerInterstitialController- for displaying interstitials
Creating Controller
There are few ways to get controller instance:
- When loading content via
AdPlayerView:
val view: AdPlayerView
val controller: AdPlayerInReadController = view.load(...)
- Reading already loaded controller from
AdPlayerView:
val view: AdPlayerView
val controller: AdPlayerInReadController? = view.controller
- Creating controller manually:
val tag = AdPlayer.getTag(context, pubId = "...", tagId = "...")

val controller: AdPlayerInReadController = tag.newInReadController()
// or
val controller: AdPlayerInReadController = tag.newInterstitialController()
Releasing Controller
All controllers must be always released when no longer needed to free underlying resources:
val controller: AdPlayerController
controller.release()
In cases when AdPlayerInReadController is attached to the AdPlayerView, it will be automatically released with the view itself.
Controller Configuration
Controllers can be preconfigured during creation:
val tag: AdPlayerTag
val controller = tag.newInReadController {
    // disable in-stream video ads
    // * available since 3.0.0
    it.disableVideoAds = true

    // override in-stream content by using CmsId
    // * available since 3.0.0
    it.contentOverride = AdPlayerContentOverride.CmsId(
        cmsId = "<custom video cms id>"
    )

    // override in-stream content by using direct video url
    // * available since 3.0.0
    it.contentOverride = AdPlayerContentOverride.DirectUrl(
        urls = listOf("https://my-cdn.com/video.mp4"),
    )
}
Controlling Video Playback
Most basic functionality, that controllers allow, is to control video playback:
val controller: AdPlayerController

// pause playback
controller.pause()

// resume playback
controller.resume()

// skip current Ad
controller.skipAd()
AdPlayerInReadController also provides additional functionality:
val controller: AdPlayerInReadController

// toggle fullscreen mode
controller.toggleFullscreen()
Controlling Audio Volume
Available since 2.3.0
Audio volume level can be changed as following:
val controller: AdPlayerController

// set max volume
controller.setVolumeLevel(1f)

// set min volume (mute)
controller.setVolumeLevel(0f)

// set average volume level
controller.setVolumeLevel(0.5f)
Volume changes can be observed through the AdPlayerEvent.AdVolumeChange and AdPlayerEvent.ContentVolumeChange events.
Listening for State Changes / Events
One of the things controller provides is ability to listen for state changes and events:
val controller: AdPlayerController

// reading current state
Log.d("TAG", "Current state is ${controller.state.value}")

// listening for state changes
coroutineScope.launch {
    controller.state.collect {
        if (it is AdPlayerState.Playing) {
            Log.d("TAG", "AdPlayer started a playback")
        }
    }
}

// listening for events
coroutineScope.launch {
    controller.events.collect {
        if (it is AdPlayerEvent.AdImpression) {
            Log.d("TAG", "Ad impressions was triggered")
        }
    }
}
Listening for Placement Type Changes
Available since 2.4.0
AtPlayer Tag can be attached to different types of placements (like in-read, fullscreen, interstitial, etc.). These placement type changes can be observed:
val controller: AdPlayerController

// reading current placement type
Log.d("TAG", "Current placement type is ${controller.placement.value}")

// listening for placement type changes
coroutineScope.launch {
    controller.placement.collect {
        Log.d("TAG", "Placement type changed to $it")
    }
}

// listening for placement type changes with java-style listener
controller.addPlacementTypeListener {
    Log.d("TAG", "Placement type changed to $it")
}
Content and Playlist
Both content and playlists are only available for insteam tags.
Managing Playlist
Playlist contains list of content videos that are played one after the other. We can read current playlist like this:
val controller: AdPlayerController

val playlist = controller.playlist.value
Log.d("TAG", "playlist is $playlist")
One important note here is that playlist is loaded by the library asynchronously and might not be available right after the controller is created. This might result in the above API returning empty playlist. It is adviced, in most cases, for the application to track when playlist changes:
val controller: AdPlayerController

coroutineScope.launch {
    controller.playlist.collect {
        Log.d("TAG", "new playlist is $it")
    }
}
Currently Played Content
AdPlayerController can be used to track which content is currently playing:
val controller: AdPlayerController

// reading current content
Log.d("TAG", "${controller.content.value} is currently playing")

// tracking content changes
coroutineScope.launch {
    controller.content.collect {
        Log.d("TAG", "$it is now playing")
    }
}

// reading playback progress
coroutineScope.launch {
    val position = controller.getContentPosition()
    val duration = controller.getContentDuration()
    Log.d("TAG", "content at $position / $duration")
}
Choosing Content to Play
In order to play different video from the playlist we can use these functions:
val controller: AdPlayerController

// play next video
controller.playNextContent()

// play previous video
controller.playPrevContent()

// play specific video
controller.playContentByIndex(3)
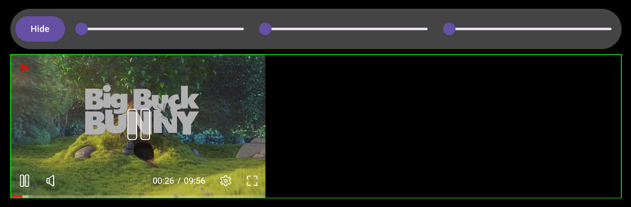
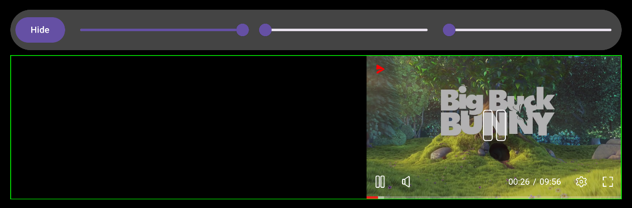
Loose Constraints and Feathering
Available since 2.1.0
By default placement and tag video content have the same sizes. Tag video content will be stretched to fill all available space in the placement (green border indicates placement size).
Sometimes it is required for video content to maintain its aspect ratio (usually 16/9). This can be achieved by using loose constraints:
val view: AdPlayerView
view.looseConstraints = true
Content Alignment
By default all content will be centered inside of the placement. This can be changed by modifying alignment flag:
val view: AdPlayerView
view.looseConstraints = true
view.alignment = 0f // will align content to the start of the placement
val view: AdPlayerView
view.looseConstraints = true
view.alignment = 1f // will align content to the end of the placement
Content Feathering
In addition to alignment it is also possible to add feathering to the content. This will apply alpha gradient to specified side of the content.
val view: AdPlayerView
view.looseConstraints = true
view.alignment = 1f
view.featheringLeading = 128f
val view: AdPlayerView
view.looseConstraints = true
view.alignment = 0f
view.featheringTrailing = 128f
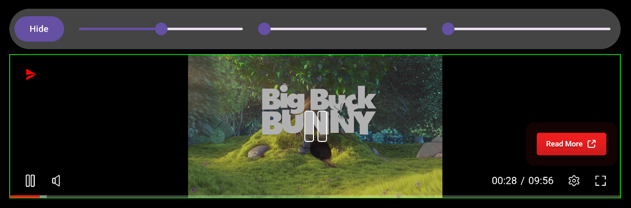
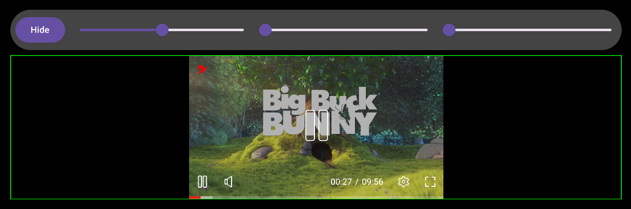
Player Controls Visibility
Available since 2.3.0
Visibility of some buttons displayed by the player can be changed if required.
Here is player displaying all buttons:

Changing Visibility
Each button can be hidden or shown:
val controller: AdPlayerController
controller.showPlayButton.value = false
controller.showSoundButton.value = false
controller.showFullscreenButton.value = false

Visibility Default Values
Visibility states are represented as a nullable Boolean? type.
This allows seamless rollback to default value by passing a null value.
val controller: AdPlayerController
controller.showPlayButton.value = true        // visible
controller.showSoundButton.value = false      // invisible
controller.showFullscreenButton.value = null  // default value
Preloading
Available since 2.6.0
Sometimes it is required to preload the content before displaying it, usually to avoid showing the loading progress to the end user.
This can be achieved by calling AdPlayerController::preload method:
val controller: AdPlayerController
controller.preload(Size(300, 250))
Preloading requires size of the target placement. This size is required for the library to know which size of the content to request. In most cases it should be the size of the placement (for in-read) or the size of the screen (for interstitials).
Progress Tracking
Calling preload method only schedules the content to be preloaded but this is asynchronous operation and might take some time.
Tracking its progress is the same as tracking state of the controller - content is
considered ready when state is different from AdPlayerState.Preparing.
Here is an example how to check when preloading has finished:
controller.value.state.first { it !is AdPlayerState.Preparing }
// content is now ready to be shown
Or by using non-async code:
controller.addStateListener(object : AdPlayerStateListener {
    override fun onAdPlayerStateChanged(newState: AdPlayerState) {
        if (newState !is AdPlayerState.Preparing) {
            controller.removeStateListener(this)
            // content is now ready to be shown
        }
    }
})